Wardrobe mods

Once or twice a year, Kris has a garage sale to raise money for missions. She accepts donated items from all over everywhere to sell.

And when Kris gives the call for donations, I know it’s time to get sorting through my stuff.

What with a new job to dress professionally for, my wardrobe could use a going over anyway.

So a few days ago, I took to sorting through my drawers and closet. Pull out everything that doesn’t fit, needs mending, or that I just don’t wear. Critically evaluate each item and sort into three piles: garage sale, rag material, and mend or refashion.

Inspired by Marisa of New Dress a Day and by the hundreds of t-shirt refashioning tutorials I’ve seen in the past several months, I was more ruthless than usual when I sorted my first bit.

I pulled out dozens of shirts, dresses, slacks, and skirts that are perfectly fine and wearable–and that I do wear–but which I’d like even more if they were modified. Short sleeves instead of long. A little tailoring here and there. Redo the hem to a more flattering length. Bits and pieces.

And I started to get to work.

A plain black high-necked, long-sleeved t-shirt became this fun shirt:

Black T-shirtBlack T-shirt

When I accidentally put the shirt on backwards (with me, an unfortunately way too common occurrence), I discovered a happy surprise. The shirt works just as well backwards with a ruffly scoop back and a boat-like front neckline.

Black T-shirtBlack T-shirt

Sorry, ladies, I’m keeping this one for myself–but I sent plenty of other clothes out to Kris’s. If you’re in Lincoln this Thursday and Friday, be sure to drop by 4800 NW 2nd Street to peruse the offerings and support missions. (This particular sale will support missionaries who work with indigenous populations in Asia, teaching “storying”–a means of teaching the Bible to illiterate or otherwise non-reading people.)

Who knows, maybe you’ll find something to “mod” yourself!


Making do

Vacuuming was on my list of household chores to get done today–but my vacuum didn’t seem to be working properly.

My first thought was to check the beater. It often gets clogged with a combination of hair and thread (that’s what I get for being a quilter with long hair.) Sure enough, I was able to extricate a handful of fibers from the beaters.

Unfortunately, this wasn’t enough to get the vacuum working. So I checked the next item on my troubleshooting list: the bag. The bag was STUFFED–so much so that dust and gunk was backing up into the hose. Gross!

That’s what I get for relying on the “change bag” light on the front of the vacuum.

I took the bag outside to empty it–and ended up ripping the bag. It’s a disposable bag, but I’ve already emptied and reused it several times. I was kinda hoping to keep using it indefinitely. But no such luck.

Torn vacuum cleaner bag

Of course, I didn’t have a replacement bag handy–why would I if I wasn’t ever planning on needing it? So, rather than running to the store (I’m putting off getting gas until tomorrow and I never like to get too far below a quarter tank), I made myself a new bag.

It’s simple really.

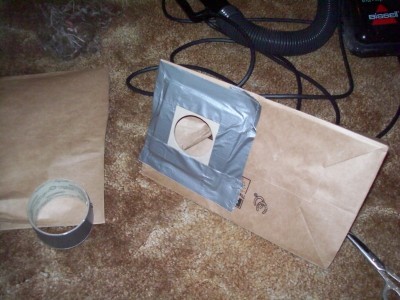
Just grab a paper bag, cut the top off and fold and duct tape the remaining top together.

Homemade vacuum cleaner bag

Now that you’ve got a bag approximately the size of a vacuum cleaner bag, cut an x on the bottom of the bag approximately the size of the vacuum cleaner’s hose inlet. Pull the cardboard square off the old bag, duct tape it over your x, and attach the hose inlet.

Walla!

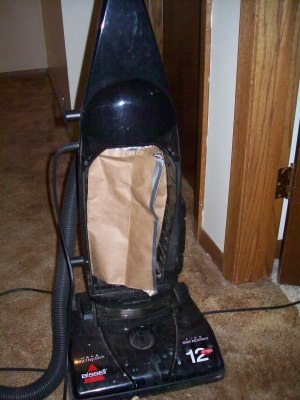
Vacuum cleaner with new bag

My newly refashioned vacuum cleaner works great!


Simple Sunday: A Clean Room

Simple Sunday icon

~Thankful for a clean room. I haven’t had one in ages, partly due to the always expanding stack of papers I was bringing home from my internship. But now, with my internship done, I can make a clean sweep–and I did. There are now about 8 reams worth of paper in my garage awaiting recycling. (The rest is carefully filed for future reference.)

A Clean Bedroom

Visit Davene at Life on Sylvan Drive for more Simple Sunday posts.